Employee Settings>Core Tables


Employee Settings>Core Tables |
|
|
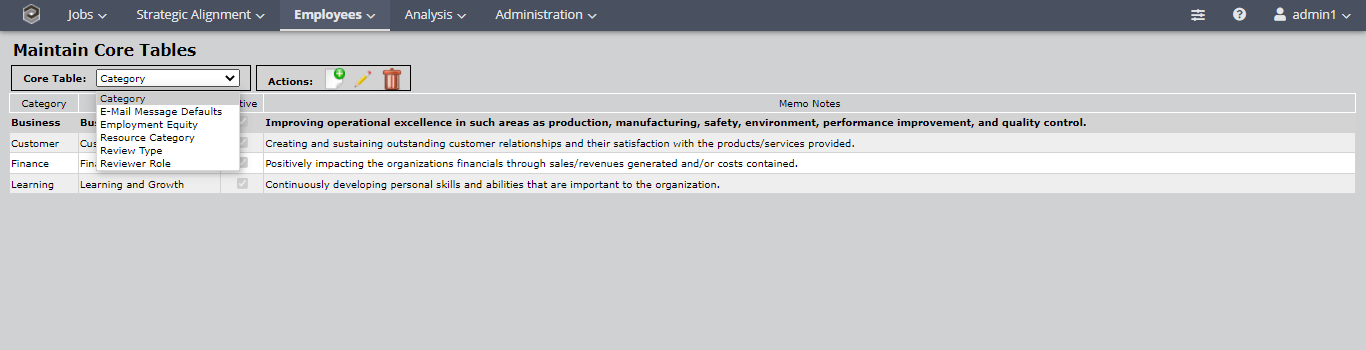
The Core tables are tables of code values that are used to link information between the various modules of the system. This function is used to maintain tables for: •Category •E-mail Message Defaults •Employment Equity codes
Note: This text is written based on the default names for all fields. If you have customized the terms for Job Family, Job Group, Resource Category or Work Unit in the Alternate Terms Policies, those customized terms will appear on your screens.
The Administration Module System Set-up function E-mail Message Defaults is used to view and customize the base text for the messages. Now located in the Core Tables
Tip: Loading Job Families, Job Groups, Locations and Work Units into Encompassing Visions can be automated using the Import Data function.
From the Main Menu move the mouse over Employees. •Click Employee Settings and click Core Tables:
•The Reference File selected from the list determines which Reference File is being viewed; change files by selecting a new entry from the list. •The selected Reference File entry is displayed in black bold font.
1.Double click the desired Reference File entry or select the desired Reference File entry and click View Actions > Edit to open the appropriate screen to modify the selected Reference File Entry. 2.Click View Actions > Add to open the appropriate screen to add a new Reference File Entry. 3.Click View Actions > Delete to delete the selected Reference File Entry (you will be asked to confirm the deletion). Note: If the Reference File Entry is linked to any other data in the system (e.g. Employee or Job) you will receive a message that the entry is used in the system and the deletion will not proceed. 4.Click View Actions > View Linked Employees to display a list of Employees linked to the selected Reference File Entry. 5.Click View Actions > View Linked Jobs to display a list of Jobs linked to the selected Reference File Entry.
Note: The View Linked Employees and View Linked Jobs functions are not available for all tables. Employment Equity Codes and Work Units do not get linked to Jobs. Resource Categories, Reviewer Roles and Skill Types do not get linked directly to Employees or Jobs.
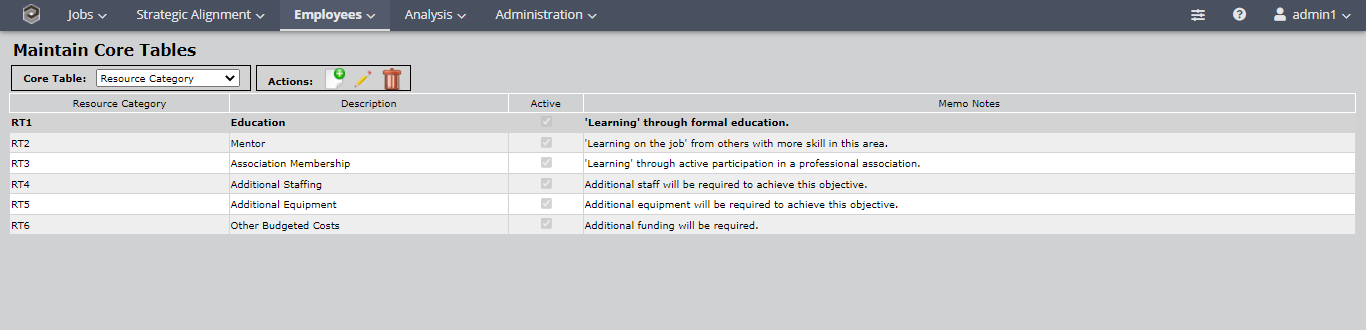
There are three different types of Reference Files maintained on this screen: 1.Simple Code Tables: This includes Employment Equity Codes. 2.Status Driven Code Tables: These include the tables whose values can be made active or inactive: Resource Category. 3.Reviewer Roles: The Reviewer Roles have special processing and are maintained on their own screen.
For maintenance of Employment Equity information, the same series of screens are used. Employment Equity is used here for demonstration purposes but the concepts apply to all the other tables as well. Functionality is the same for all tables unless otherwise stated.
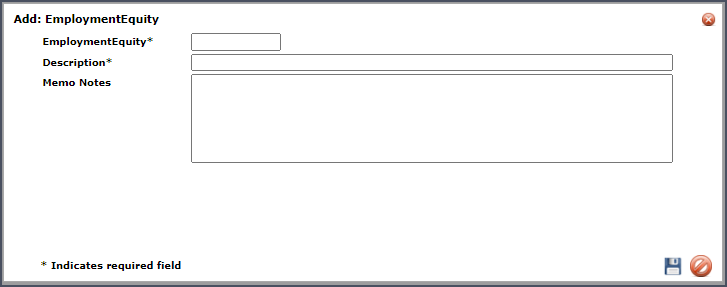
The Insert Employment Equity screen is used to add Employment Equity information:
•The Employment Equity is the Primary Key for the Employment Equity table and must be unique. •Enter the Description or Memo Notes in the text boxes . •Click •Click
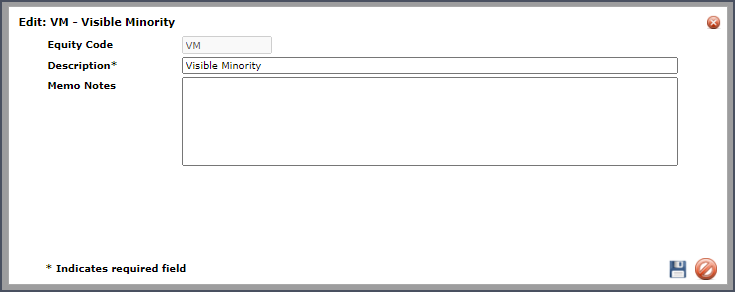
The Edit Employment Equity screen is used to maintain Employment Equity information:
•The Employment Equity is is the Primary Key for the Employment Equity table and can not be changed.
1.Change the Description or Memo Notes by making modifications in the text boxes . 2.Click 3.Click
Reference File entries can only be deleted if they are not linked to other Data in the system: •An Employment Equity Code and a Work Unit cannot be deleted if it has been assigned to any Employees in the system. •A Job Family, Job Group or Location cannot be deleted if it has been assigned to any Employees or Jobs in the system. •A Job Group cannot be deleted if it has been assigned to a Competency Characteristic or an Employee Review in the system.
Use the View Linked Employees and View Linked Jobs functions to determine what entries you will have to update before you can delete the desired Reference file entry. Status Driven Code Tables allow the values in certain Reference Tables to be made Active or Inactive. Making a Reference File Entry inactive allows it to remain in the system for viewing and reporting of historical information while excluding it from being used in the creation of any new records in the system. For example, making a Resource Category inactive will allow it to be displayed in old work plans that used the Resource Category but any new work plans created will not be able to choose that inactive Resource Category because it will not show up in the list of available resource categories.
The Reference Files that are maintained with this screen include Resource Category. The functions allowed for Resource Category maintenance are: •Adding a new entry. •Editing an existing entry (including Activating or Deactivating the entry). •Deleting an existing entry.
Note: If you have defined an alternate term for 'Resource Category' (see Policy Descriptions, Policy Group Alternate Terms) then the screen title and field names will reflect the alternate term assigned.
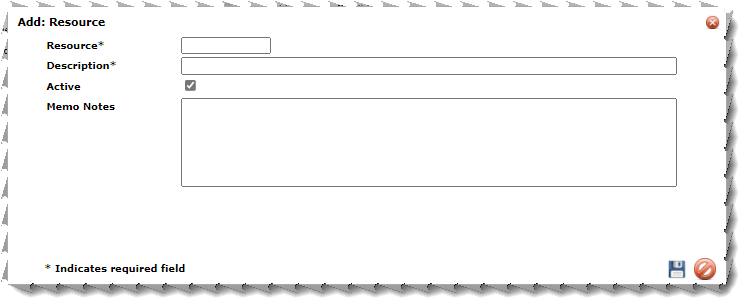
Add New Entry The Add Resource Category screen is used to add Resource Categories to the system:
•The Resource Category is the Primary Key for the Resource Category table and must be unique. •Enter the Description and any desired Memo Notes in the text boxes .
1.Click in the Active box to uncheck ( 2.Click 3.Click
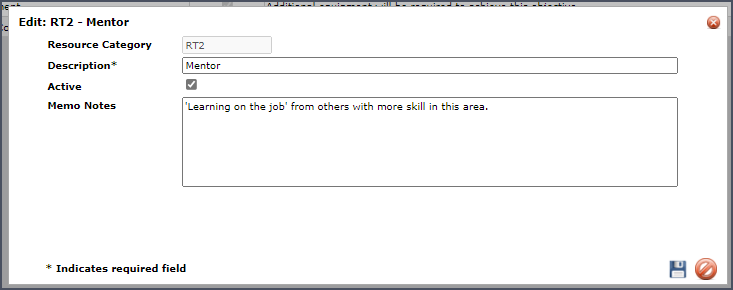
Edit a Resource Category The Edit Resource Category screen is used to modify, activate and deactivate Resource Categories in the system:
•The Resource Category is the Primary Key for this table and cannot be changed.
1.Change the Description or Memo Notes by making modifications in the text boxes . 2.Click in the Active box to uncheck ( 3.Click 4.Click
Note: Resource Categories can be linked to Employee Work Plan Objectives in Objective Field Configurations. Making a Resource Category Inactive when it is no longer used in your Organization will allow Administrative Reports and historical Work Plans to display the Inactive Resource Category but will prevent the Inactive Resource Category from being entered in any new Work Plan Objectives.
Delete a Resource Category Resource Categories can only be deleted if they are not linked to any Work Plans in the system. Any Work Plans that are linked to the Resource Category to be deleted must be modified to be linked to a different Resource Category before the selected Resource Category can be deleted. It is recommended that you Inactivate the Resource Category instead.
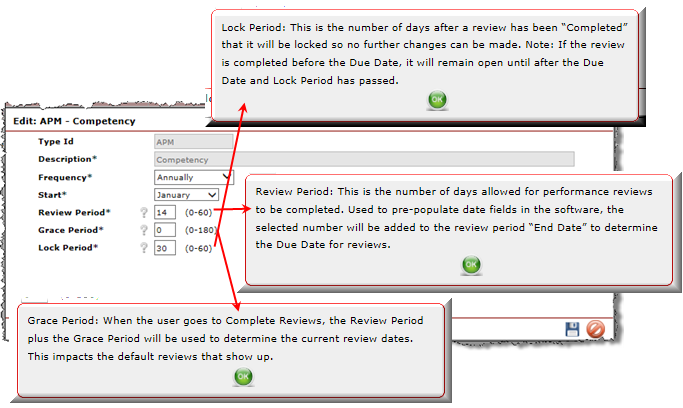
The Review Type core tables are used to manage when a Review can be completed. The table identifies 3 types of Reviews and the configuration for each Review Type.
Note: Current clients will see their previous configurations populating this table. For new clients, the default configuration is: Annual Frequency, Start Month is January, 30 day Grace Period and 14 day Lock Period. Edit a Review Type Select the Review Type, View Actions and Edit or double-click the Review Type to open the Edit Review Type screen.
1.Select the Frequency and Period Start Month from the pick lists. 2.Enter the Review Period and Lock Period (in number of days). 3.Click 4.Click
Note: If someone has not started the Employee Review(s) prior to the review period rolling over (Due Date has passed), an Administration user will be able to create a review for the previous review period. With this change to the “Lock Period” process this will allow reviews to be created and completed for the previous review period.
Reviews will remain opened for up to two years and will not lock until the review has been completed.
Reviewer Role is used in the identification of Work Plan or Competency Reviewers. By default, Encompassing Visions supplies the following Reviewer Roles: •CLIENT - used when the reviewer is a customer (internal or external) of the reviewee. •INCUMBENT - used when the reviewer is the employee (reviewee). •PEER - used when the reviewer is an associate or reviewer at a similar level to the reviewee. •SUBORDINATE - used when the reviewer reports to the reviewee. •SUPERVISOR - used for the reviewer the reviewee directly reports to.
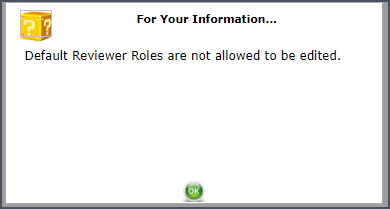
All of these Reviewer Roles are System Locked (the "Default" column on the screen displays •CLIENT and SUBORDINATE are used when testing the Learning and Growth Management Policies to allow Clients or Subordinates to perform skill assessments. •SUPERVISOR and INCUMBENT are used for defaulting reviewers as established by the Policies for Default Reviewers in the Business Objective, Professional Development Objective and Competency Reviews Policies.
Any User Defined entries - those entries created by your Organization - can be modified or deleted.
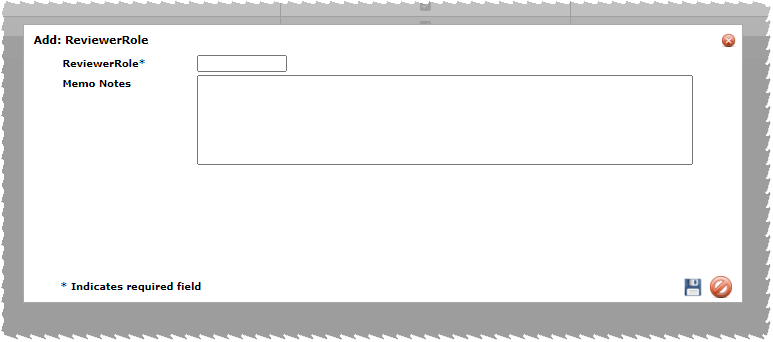
Add New Entry The Add Reviewer Role screen is used to add Reviewer Roles to the system:
•The Reviewer Role is the Primary Key for the Reviewer Role table and must be unique.
1.Enter any desired Memo Notes in the text box . 2.Click 3.Click
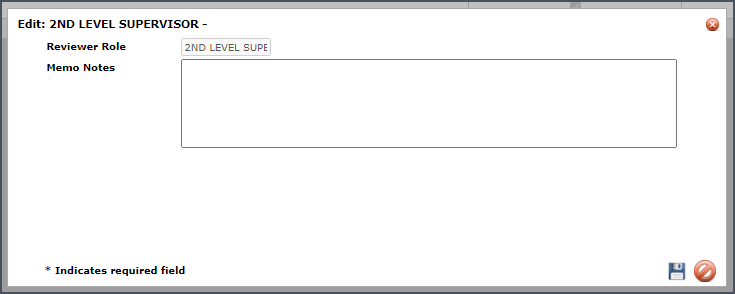
Edit a Reviewer Role The Edit Reviewer Role screen is used to modify memo notes of user defined Reviewer Roles in the system:
•Change the Memo Notes by making modifications in the text box .
1.Click 2.Click
Delete a Reviewer Role User Defined Reviewer Roles can only be deleted if they are not linked to any Reviewer records in the system. Any Reviewer records that are linked to the Reviewer Role to be deleted must be modified to be linked to a different Reviewer Role before the selected Reviewer Role can be deleted. (See Maintain Reviewers in Measuring Learning and Growth for information about editing Reviewers).
|