Data Integration and Import


Data Integration and Import |
|
|
The Encompassing Visions Import enables the transfer of data from other applications to Encompassing Visions to reduce the amount of data entry required by the Encompassing Visions Administrator. This exercise can be done early in the implementation process as it can create your organization structure, set up your reference file tables, set up your employee and user information and begin the set up of your organization's jobs. The Manual Import can be used by the Encompassing Visions Administer to do infrequent or initial importing of information. For regular synchronization from other applications the Automated Import Service can be used.
Notes: •The Imports require files in very specific formats and locations. These files likely have to be created by your IT Department. •The Automated Import requires the installation of the Encompassing Visions Automated Import Service. This service is installed separately from the Encompassing Visions application and requires set-up work by your IT Department. The Encompassing Visions Automated Import Service installation CD and additional Import documentation can be requested by contacting Encompassing Visions support staff at techsupport@encv.com. This CD contains the Data Integration Installation and Scheduling Instructions.
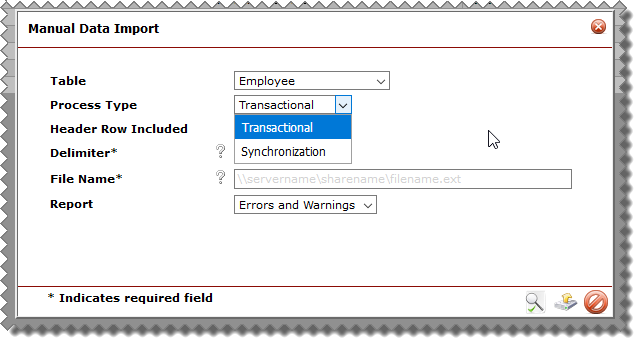
At a high level, the following are the steps that you must go through before using the Import Data function: 1.A separate file for each of the tables to be updated must be created in the correct format. There are two choices for these files: Transactional - in which each transaction is identified with an add, change or delete transaction type or Synchronization - in which the system will determine whether the transaction is an add or change and based on existing Encompassing Visions data and process the information accordingly. 2.The files need to be placed on the server where the Encompassing Visions application is running or with the appropriate mapping that allows the file to be located by the Encompassing Visions application. 3.For a manual import, the Encompassing Visions Administrator will use the Manual Import to identify the files to run and the applicable parameters and then review the generated Audit Report. Also viewed through the View>Batch Details. Any corrections can be made and the file re-processed as necessary. 4.The Data Integration Program facilitates automatic updating of the Encompassing Visions data when other applications or data sources within your organization get updated. The Data Integration Program currently process only Employee data and the User information associated with each employee. The Administrator can be notified via E-Mail when the imports are run and they can review the generated Audit Report. Also viewed through the View>Batch Details.
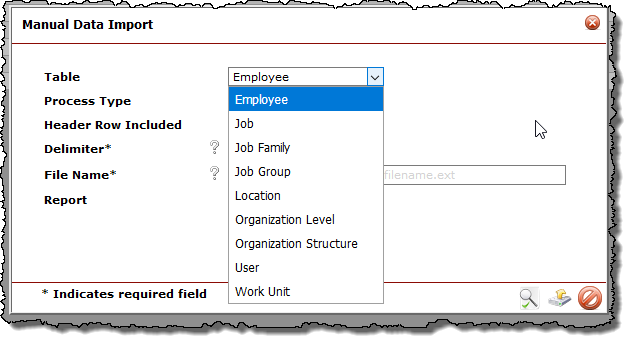
The data that can be Imported includes: •Employees •Job Families •Job Groups •Jobs •Locations •Organization Levels •Organization Structure •Users •Work Units
1.From the Main Menu move the mouse over Employees. 2.Click the Employee Settings and click Data Integration and Import Data function:
Click on the Actions>
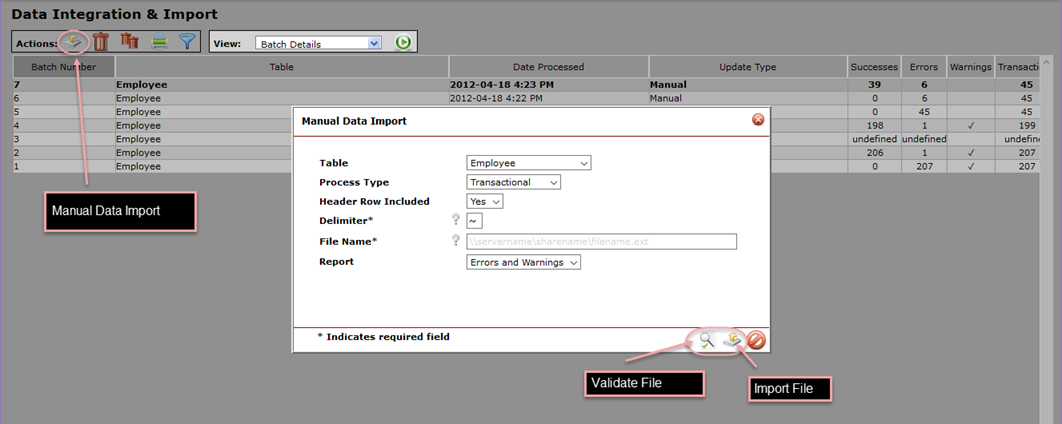
There are two options from this screen: •Validate File - runs a simulation of the Import of the file to determine if there are any errors or warnings with the file without actually applying the updates to the database. •Import File - runs an actual import processing the transactions in the specified file.
It is important to note that while the Validate function will simulate the processing of the file, there are some things that it does not do: •It does not check to ensure that the job constraint will not be violated. Rather, it assumes that you want to check the accuracy of all the transactions in the file and those checks wouldn't be done if the 'add' records were rejected because the constraint would be violated. This constraints is checked when the actual import is performed. The validate does check for the employee constraint but it does not take into account any employee deactivations or deletions. •It can not validate an update to a record that was just added through the same import because it does not know that record has been inserted. These changes would be rejected when the record was not found in the database to update. •It does not provide information about records that pass validation with no warnings. Only the Import does that.
In either function, the details about the file being imported must be identified. The creator of the files will have to identify this information for you: •Select the Import Table that the imported transactions apply to.
•Select the Type of Import.
•Enter the Delimiter used in the files.
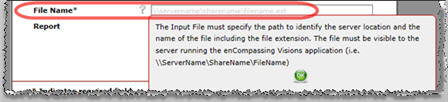
•Enter the name of the input file - including any necessary path information the application requires to locate the file on the server.
•When the Header Row included in File is marked YES from the drop down menu, the Import will expect that the first record in the file contains a header containing the field names in the file and will ignore the first record in the file. If there is no header row, then click NO from the drop down menu. •Choose whether to show Errors and Warnings or Errors only. There are many warnings generated when optional fields are left blank. In some situations it may be desirable to leave these warnings off the generated report. •Click Validate File to validate the file according the criteria outlined or Import File to proceed with the processing of the file. From either option, the report screen is opened showing the results:
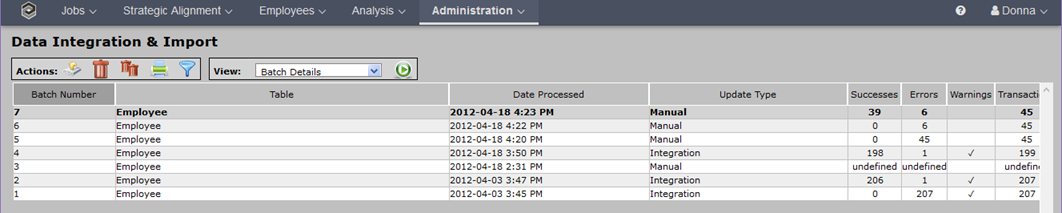
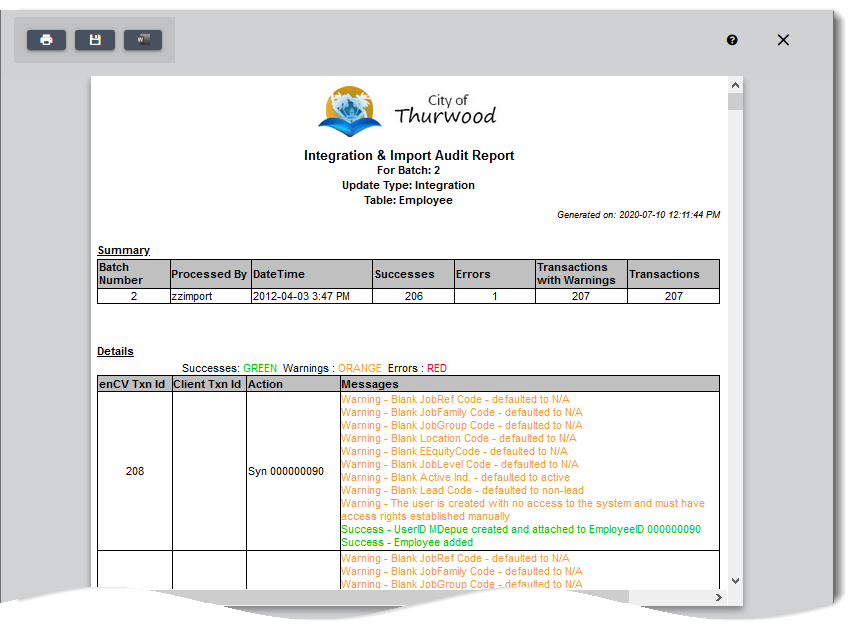
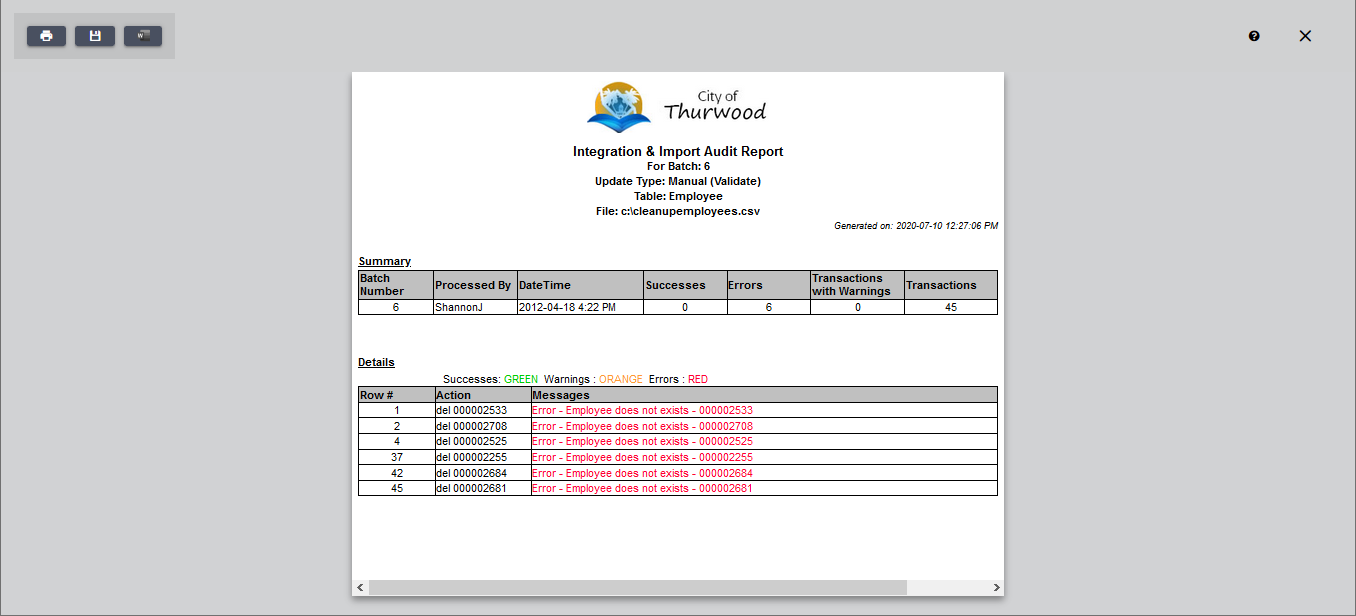
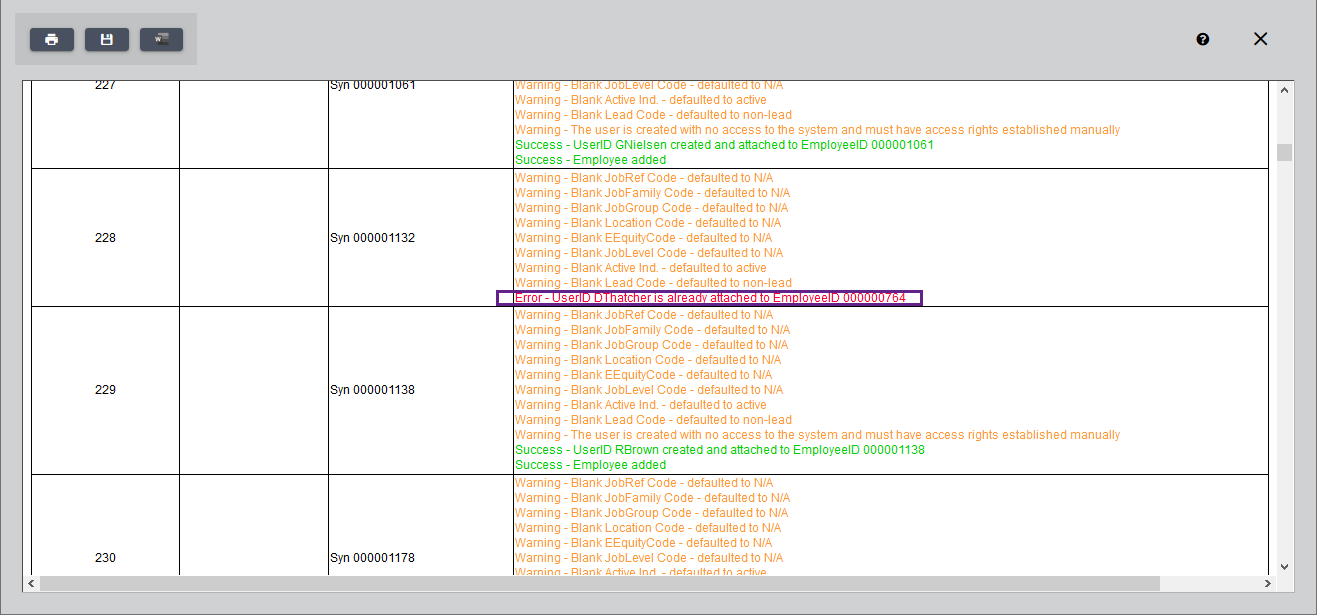
•The headings of the report will identify the batch number, whether the batch was a Data Integration run or a Manual Import, whether the Manual Import was a validation or an update, the type of information updated and the name of the file used for the Manual Import •A count of the successes, errors, warnings and total transactions will always be shown at the top of the report •The report details will identify any messages and processing results for each transaction in the batch •The report can be printed or saved to file
Note: Data Integration batches will show that they are processed by user zzimport. This is a user ID internal to Encompassing Visions with the necessary permissions to perform imports. It will not be visible in the user list so the user ID can not be updated or deleted accidentally. Manual import batches will show the user ID of the user who actually ran the import. •Clicking Print will open a Microsoft Windows Print screen to allow you choose options for printing and print the report. Reports will not print with the proper formatting if you print them using the print button on your browser. •Clicking Save will open a Microsoft Windows Save HTML Document to allow you to choose a location to save the report to and choose the type of file. Save all reports as HTML files. The default file name will be the name of the generated report. Saved reports can be opened with Microsoft Word, Microsoft Excel or Microsoft Internet Explorer for viewing, manipulation and/or printing. All of the formatting seen in the original report is carried forward when opened with these other tools. •Clicking Close will close the report and return to the Manual Import screen.
If errors are generated the record will not be processed. In this scenario, the records must be corrected before they can be reprocessed.
Employee information can be reviewed and maintained by the Encompassing Visions System Administrator through the Administration Module under the System Setup section. General Notes •When an employee is deleted, their User ID – if they are linked to a User ID – is deactivated and unlinked from the employee. If the User ID is to be deleted as well it will have to be deleted manually through the User Maintenance function. •When an employee is deleted, all records associated with the employee are deleted – work plans, training logs, incumbent reviews, employee skills etc. This process is irreversible. The only records not deleted are reviews that this employee completed about another employee.
The staging table is part of the Encompassing Visions WPVisionsWeb database. There will be two tables for each Encompassing Visions table that can be updated – one for the staging data and one for processed data.
Employee Table Layout •Table Name: stgEmployees •Mandatory fields in this table are: TransactionType and EmployeeID •For adding a new employee, the only additional mandatory fields are the employee first and last name fields. •For all other fields the system will apply a default if no value is specified. This is the same defaults as would be set if the employee were being added manually through the application. Populating the Employee Staging table It is the responsibility of the client to populate the staging table with the transactions to be processed against the Encompassing Visions employee table based on the business rules specific to the client organization. These transactions will be generated based on changes to the source database through the source application (e.g. the HRIS or payroll system).
Staging Table Data Processing General Processing When correcting errors you will always have the option to make the correction manually by entering the desired information right into the Encompassing Visions application and then ignoring the transaction errors that came through the integration process. However, we would recommend that you limit your manual updates to the employee database if you are using the integration function to minimize the chance of data inconsistency between Encompassing Visions and your source application. General Notes: Administered Job Level Administered Job Level is the Job Level that the employee is being paid at/administered at if it is different from the Job Level that is determined from the evaluation of the Job that is assigned to the employee (Evaluated Job Level). Note: The Evaluated Job Level field that is displayed on the screen is calculated by the system based on the Job that is assigned to the employee and can not be updated. Benchmark Job Reference
Benchmark Job identifies the Encompassing Visions Job that this job was cloned from. Changes flow thorugh this job to the Job Evaluation for all cloned jobs.. The Benchmark Jobs are identified in the Jobs table with an indicator and the cloned jobs all have a field that holds the original Benchmark Job. This information exists in the Job table and not the Employee table. It is included in the Employee Staging table to facilitate the look-up of job information for some Job Evaluation implementations and will not likely be utilized by most clients. E-Mail Address •Used for sending learning and growth and training emails to Encompassing Visions employee users •Must specify the entire email address including domain •There is no email address look-up or validation Note: Specifying email address in the Employee Data Integration is optional but the notifications function can not be utilized unless email addresses are populated. Job Group Job Group information is updated through the Manual Import Only. The maximum number of added or reactivated employees is controlled by the Employee Constraint. If the number of employees being added or reactivated takes the client over the Constraint limit, the Integration Package will reject any inserts (or updates to reactivate an employee) over that number. The Encompassing Visions System Administrator has access to view the current Employee Constraint and can purchase an increase by contacting Encompassing Visions support staff. From here the Encompassing Visions System Administrator will be able to specify: •Whether or not User IDs are to be automatically created if they don’t exist •For automatic user creation, a default profile to be utilized to create users. If no profile is specified then the user will be given only access to login and menu and the administrator will have to update the access rights. •The email address (or addresses) to be notified when a batch of records is processed •The conditions under which the email notifications are to be sent (e.g. only when there are errors, only when there are errors or warnings, for all batches processed or for no batches processed). •Whether or not to enable the Employee Data Integration Processing** ** This policy is being included because there may be times when the System Administrator qill want to override the automatic processing and turn it off temporarily. In this situation the transactions would accumulate in the staging table and will be processed when the policy is turned back on. For example, in the event of a scheduled upgrade outage or during review time Reporting Errors in a batch are reported via email based on the E-Mail address(es) identified in the application for the table specified. The Errors are also reported by batch number in detail in the Data Integration & Import function. The error report can be viewed online, printed or saved to a file.
Correction
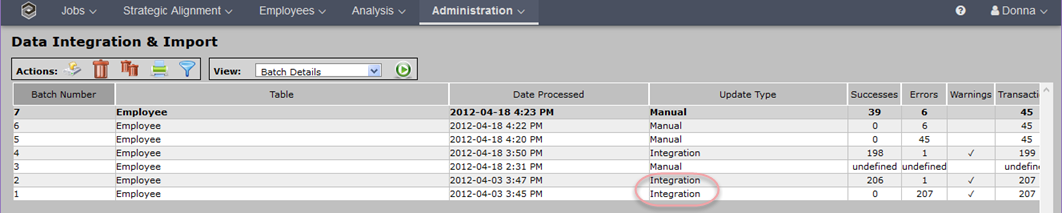
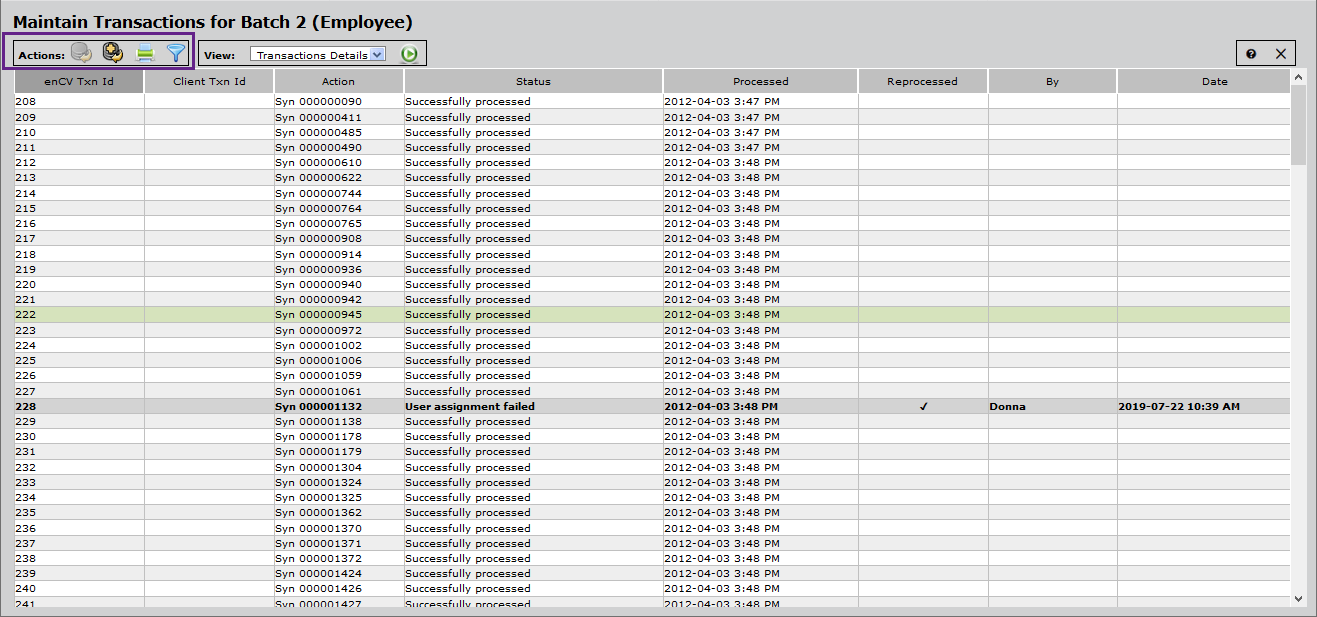
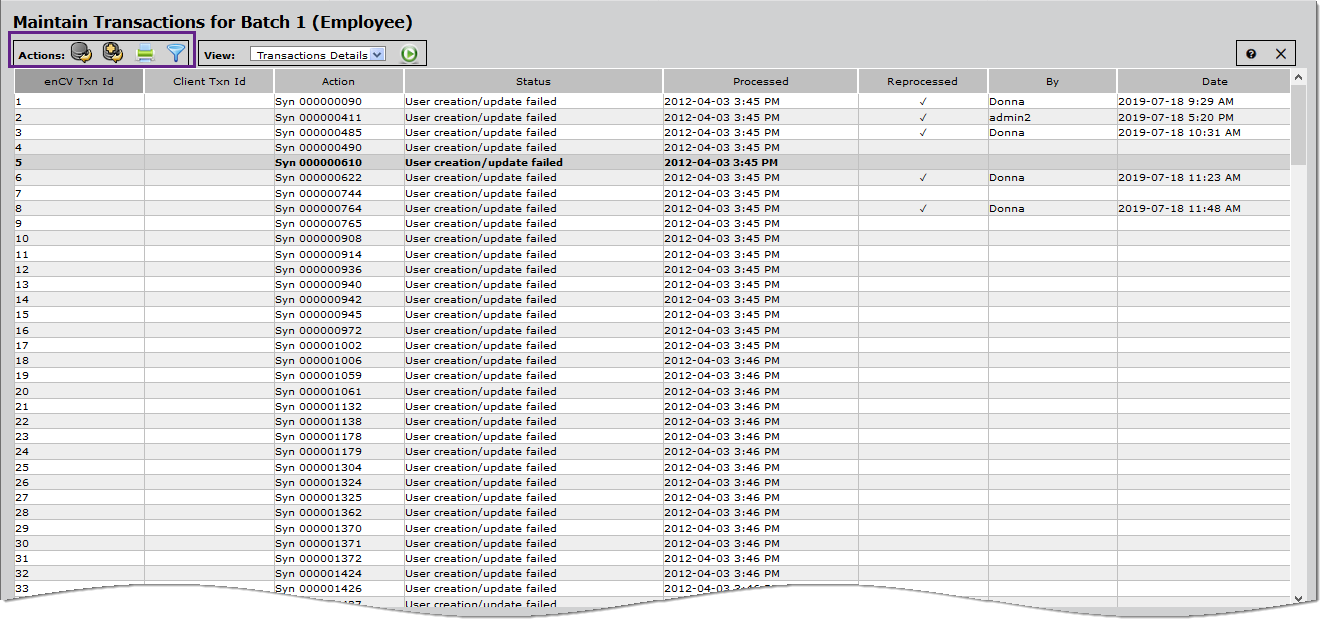
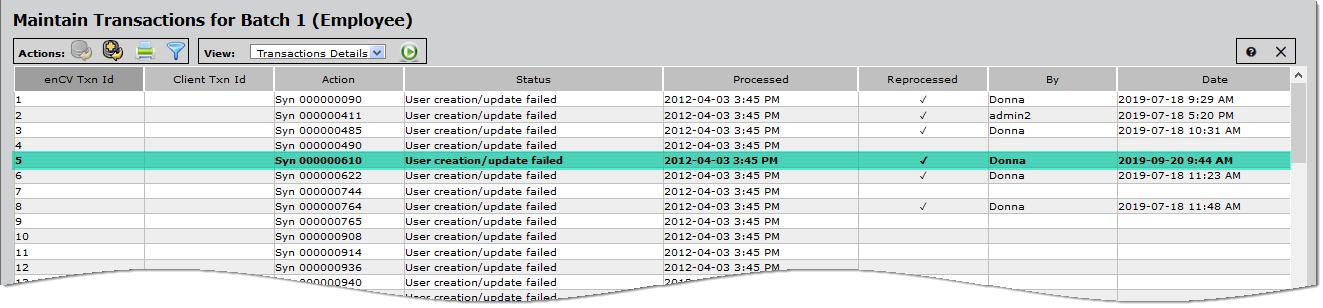
The Data Integration & Import function includes the ability to review the unprocessed transactions and either reprocess them or ignore them. The transactions can be viewed by batch number and will always be shown by default with the latest batches at the top of the list (see above image directly below the title Data Integration & Import). Transactions to be reprocessed (after correcting the error within the Encompassing Visions data) will be copied back into the Employee Update Staging table and re-processed. Transactions that are to be ignored (i.e. they will be handled manually or shouldn’t have been sent in the first place) will be marked to ignore and will be removed from the error table when the historical batch information is cleaned up.
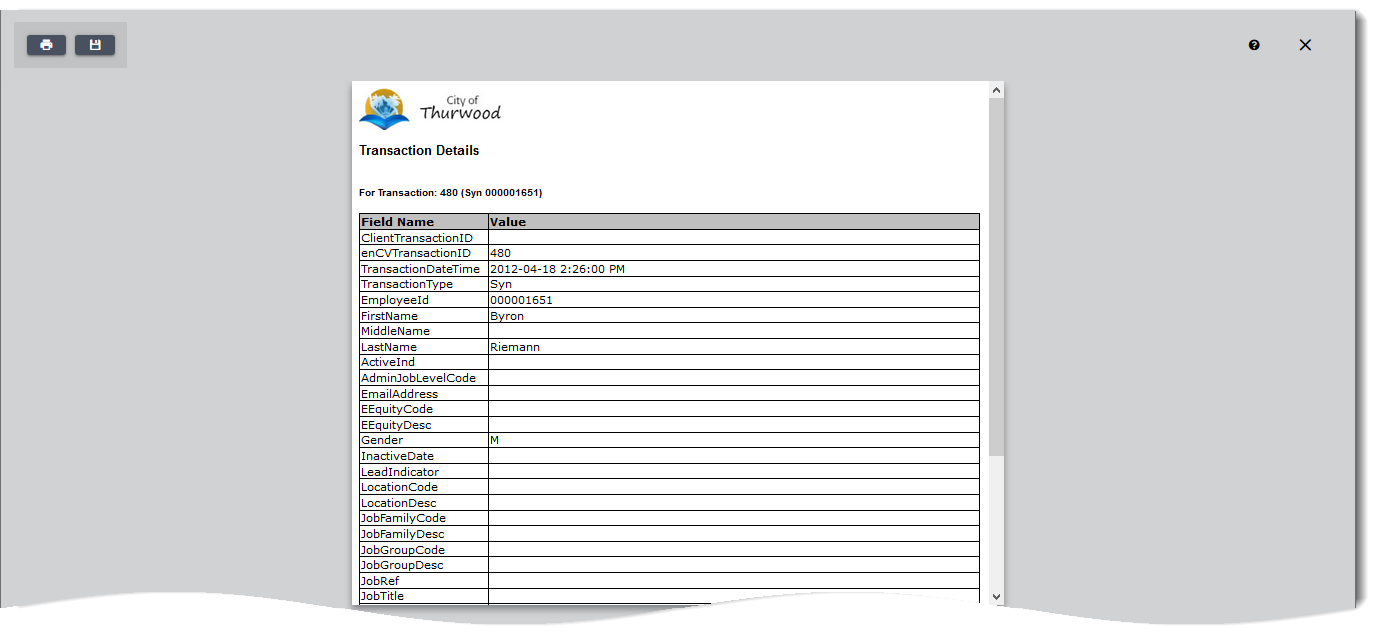
The To get a detailed report of each transaction go to View>Transactions Details and
Cleanup The Data Integration and Import function includes the ability to delete historical batch information. The client Encompassing Visions system administrator will determine how long to keep the audit trail of the processing records and when to delete old batches. We recommend the batch report be run and printed or saved to a file if an audit trail is required. This historical cleanup will also delete the record of unprocessed, reprocessed and successfully processed transactions in each deleted batch.
Click
Processing •At this time, user records can only be added or deleted. Change transactions are not permitted. •At this time, users can only be identified as active and can not be inactivated (or reactivated) through the Import. •Only Users can be processed through Import. Profiles must be added manually by the System Administrator. •There is no limit or constraint on the number of users that can exist within your application.
Note: When an employee is deleted their User ID (if they have one) is automatically made inactive and unlinked from the Employee. If the user is to be deleted as well it has to be deleted manually in the User Maintenance screen. The User ID is the login the employee uses to access the system. It determines which modules they can access. Important Note: UserIDs are case sensitive in the login screen and will be created as entered in the staging table with no case conversion.
Processing: •The Data Integration & Import policy ‘Process User and/or Profile Updates in Employee Data Integration Program?’ will determine whether or not the processing of User information will occur if the UserID field in the staging table is populated. This will create User Ids based on the User ID supplied if a user does not yet exist and allow a User’s security access profile to be established or updated. •If a valid profile is provided in the ProfileID field (see below) then the user will be created with the profile specified. •The Data Integration & Import policy ‘Default Profile ID for user creation in Data Integration’ will determine the profile ID to be used for any new user IDs that are created where the ProfileID field is not populated in the staging table (or not valid as populated in the staging table). If none is specified then the User ID will be created without any Profile specified and with no access rights which will mean that the User ID will have to be updated manually through the Encompassing Visions application to set the access rights before the User will be able to log in. •User IDs created via this process will have the password defaulted to the Employee ID and will be set to expire immediately – regardless of the system policy values for password expiry – to force the user to change the password the first time they log in. Note that individual user passwords can not be reused within Encompassing Visions.
The Profile ID is a primary key and can not be changed. The Profile ID specifies the profile of access rights that is to be assigned to the user.
Note: The purpose in allowing the profile to be specified through the Employee update is because the information that may be used to decide which profile to assign the employee would reside on the Employee table. |