Work Plans


Work Plans |
|
|
With this function you can view and maintain the Work Plans for individual Employees. There are two types of work plans in the system: Business and Professional Development plans. The work plan is a collection of Objectives the Employee will complete during the year. The information enabled or required for each objective type is updated and stored in the Objective Field Configuration screen (Administration > Objective Field Configurations). Note: The configurations are set by the Administrator and are universal to all Employees.
The general steps for creating a work plan are: •Select the type of work plan to be created. •Create the work plan (either by starting a new work plan or copying an existing work plan). •Add the required Objectives. •For each objective, include any applicable Resources and Employee Notes. •Validate the work plan. •Approve the work plan (if your organization requires Employee Approvals). •Ask your Supervisor (Lead) to review and Approve the work plan. •Review and update the list of Reviewers for your work plan, if required.
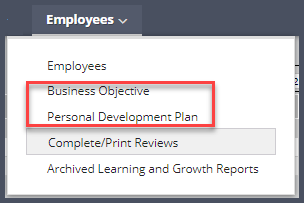
From the Main Menu move your mouse over Employees in the navigation bar and click the Business Objectives (BO) or Professional Development Objectives (PDO) sub-menu function to open the BO/PDO work plans screen.
Note: "Business Objectives" and "Professional Development Objectives" are terms that can be customized in the system to reflect your organization’s terminology. See Policies > Administration > Alternate Terms for more information. If these terms have been customized, every place where “Business Objective” and “Professional Development Objective” is referenced, you will see the alternate term chosen by your Organization.
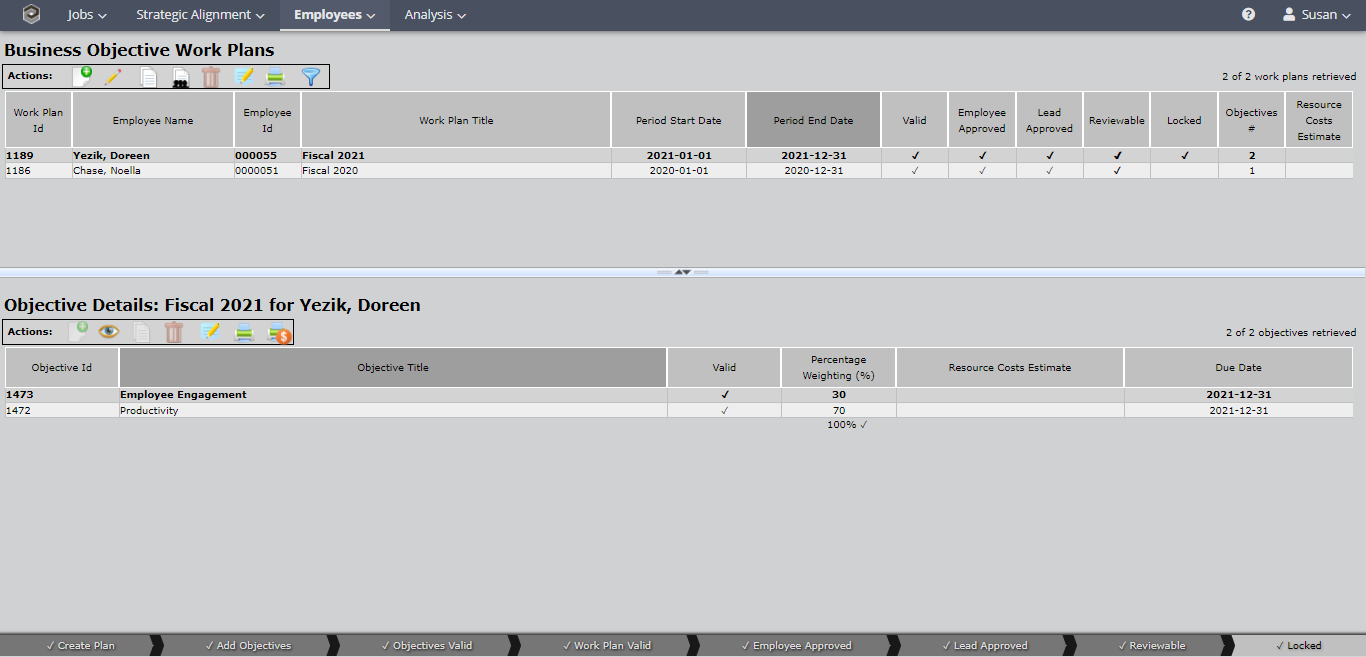
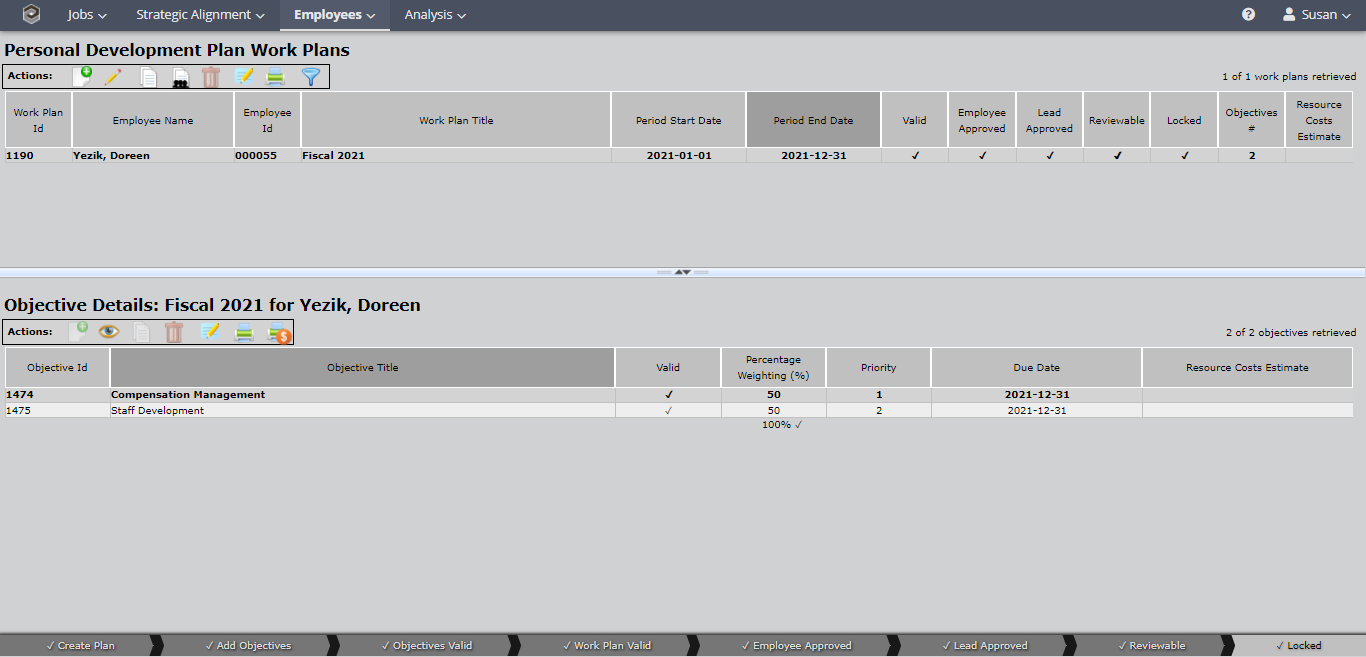
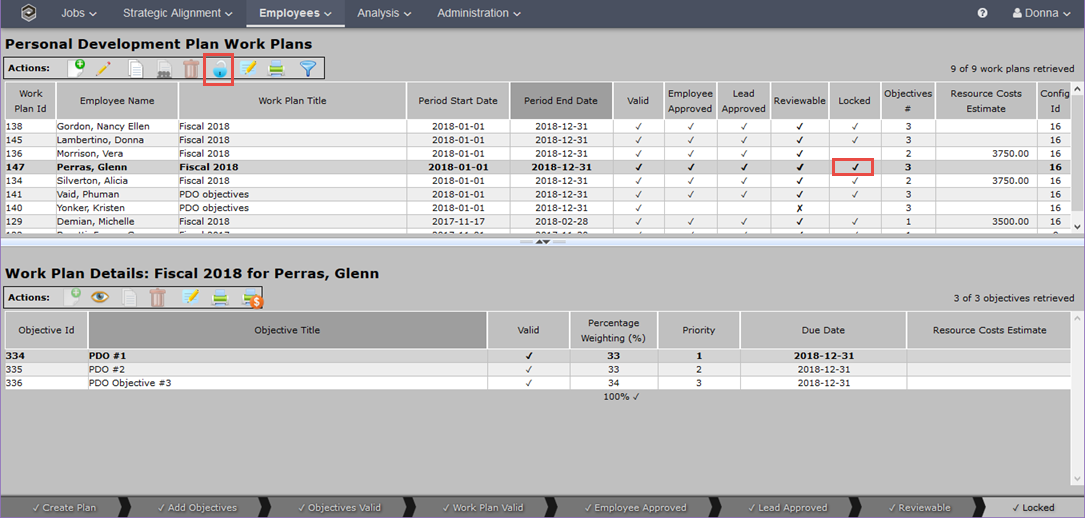
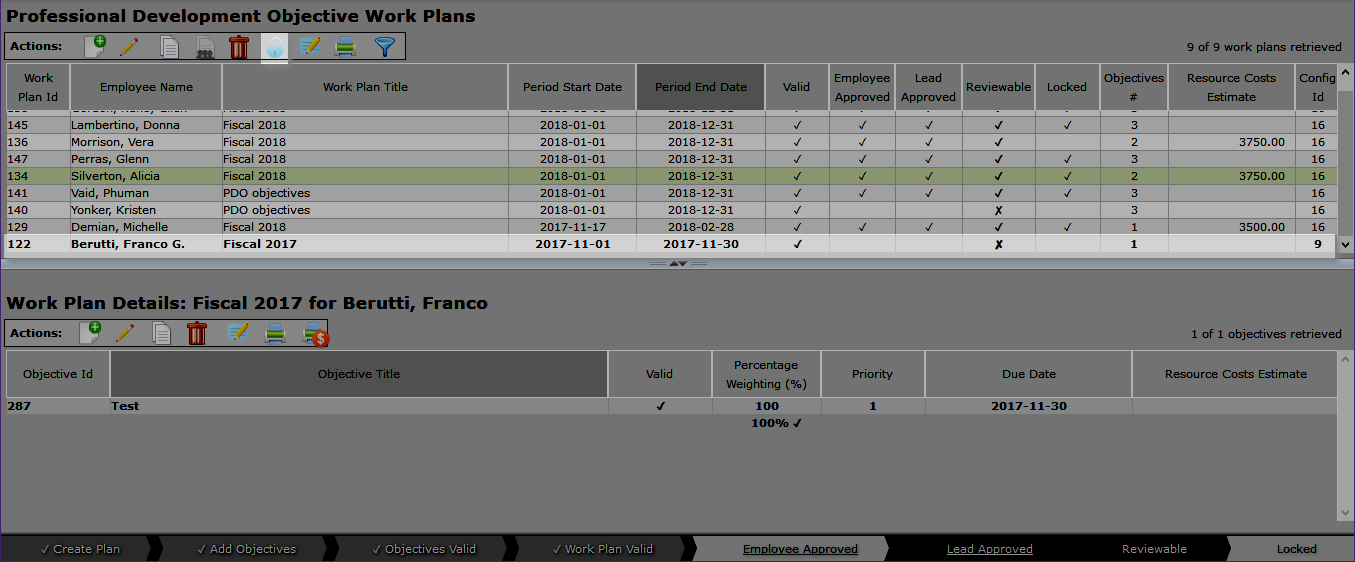
The work plans screens are presented in split screen format. The upper table reflects the work plans the User is authorized to view or maintain. The lower table reflects the detailed objectives for the selected work plan.
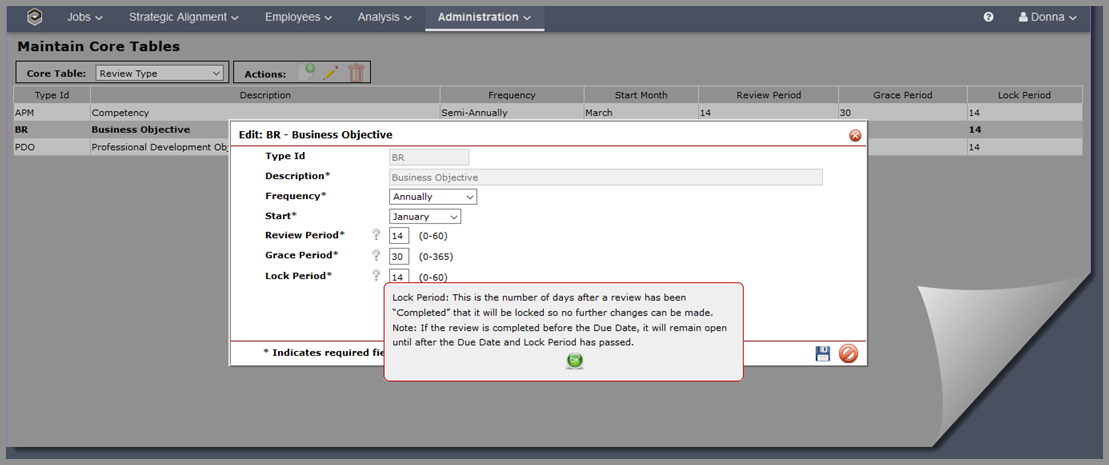
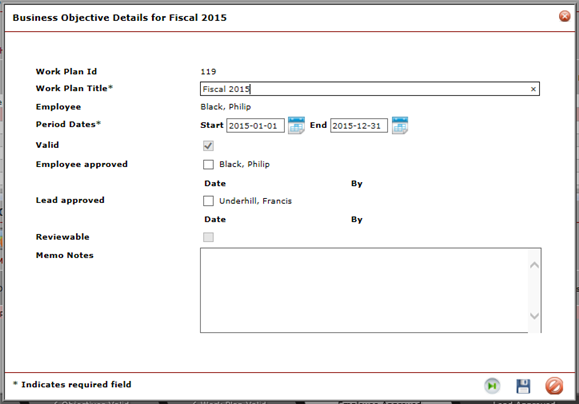
The following information is contained in the upper table: •Work Plan ID •Employee ID – this column is hidden if the Policy: Show Employee ID on Non-Admin Screens and Reports? in Policies > Administration-General is set to No. •Employee Name •Work Plan Title •Period Start Date •Period End Date •Valid column becomes checked when the work plan has been validated. Note: Previously known as complete. •The Employee Approved column indicates whether the work plan has been approved by the Employee; Approved is checked •The Lead Approved column indicates whether the work plan has been approved by the Employee's Lead; Approved is checked •Locked means the work plan has been evaluated and it can no longer be edited. See Administration > Core Tables > Reviewer Type for more information.
•Objectives # indicates how many objectives are included in the selected work plan. •Resource Estimate – this column will be hidden if the organization does not track Resources. If enabled, this field reflects the total estimated cost to achieve the related objectives (as detailed in the lower table). •Config. ID Note: Simply click the column title to sort work plans. The default sort is Period End Date in descending order, so the newest work plans default to the top of the list.
The following columns will always appear in the lower table: •Objective ID •Objective Title •The Valid column remains blank until every required field in the objective has been completed. The Valid column becomes checked when each field within the Objective Details screen has been completed and saved. Note: There is no validation process completed at this stage. •The other columns in the lower table will vary depending on the Objective Field Configuration. See the Help section: Administration > System Setup > Objective Field Configurations for a complete list of configuration options.
Filters
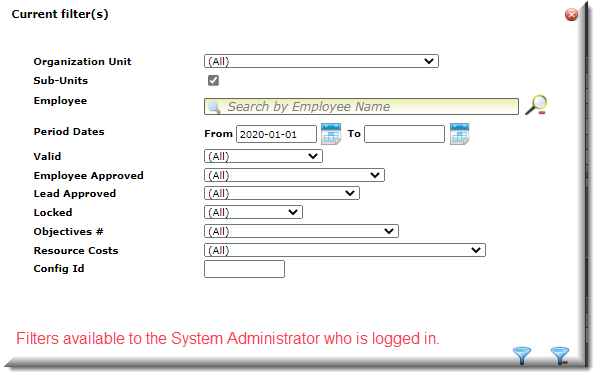
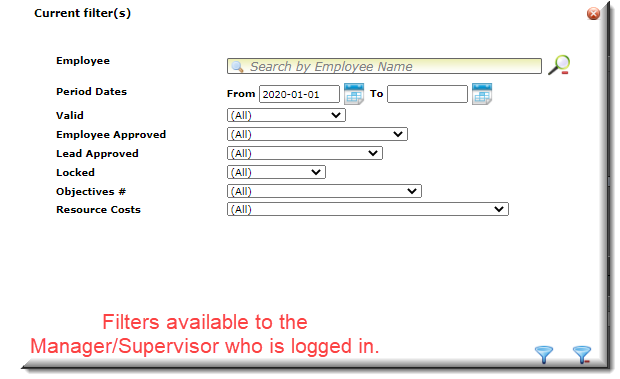
Note: The filter sample below shows the filter selection if the policy: Employees>Organization Do you use Employee/Supervisor relationship for Reviews? is set to NO (default) or Yes.
You can filter by one or more fields associated with the Employee. Click Organization Unit – Defaults to the top level of the Organization that you have access to view. Administrative Users can see All. Non-Lead Employees will not see this option. Sub-Units – Check to include Sub-Units. Non-Lead Employees will not see this option Employee Name – Only viewable for a Lead or Administrative User. Non-Lead Employees will only be able to view their own work plans and objectives. Period Dates – Select Note about period date filters: The period date filter defaults to the beginning of the current review period in the From field. The To field is blank. Valid – Options are: All, Completed Only, Not Completed Only. Employee Approved – Options are: All, Approved by Employee Only, Not Approved by Employee Only. Lead Approved – Options are: All, Approved by Lead Only, Not Approved by Lead Only. Locked – Options are: All, Locked Only, Not Locked Only. Objectives # - Options are: All, Work Plans with Objectives only, Work Plans with no Objectives only. Resource Costs – Options are: All, Work Plans with Resource information only, Work Plans with no Resource information only. Config ID – Visible only to Administrative Users for the purpose of identifying work plans that are linked to a specific Objective Field Configuration. The more filters you use the more narrow your search will be. If no records are found, try to search again with fewer filters. To clear all filters, click
1.Select
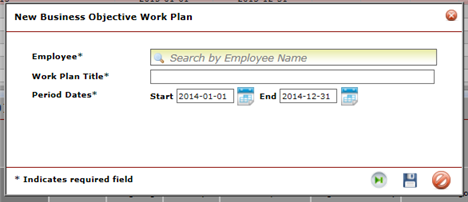
2.The Work Plan Title Field is pre-populated with the "Fiscal Year". This is to encourage consistency in the title of the work plans from one year to the next. a. Complete the Work Plan Title field if changes are required. 3.Select the Period dates using 4. 5.When saved and highlighted in the upper table, the Insert icon from the Actions Bar in the lower table is enabled for that work plan and objectives can be added at this time. See Objectives for detailed information.
6.If Resource Information is Enabled for the Objectives, the Resource icon from the Actions Bar in the lower table will be active. See Resources for detailed information.
7.Add Confidential Comments by clicking 8.Add Employee or Lead Comments. 9.Click
Note: Confidential Comments can also be added to the specific objective by selecting the Confidential Comments icon in the lower table.
A note about Confidential Comments: The Employee and the Lead can add comments to the Work Plans. These comments are confidential to the User (Employee or Lead). That is, the Lead cannot see the Employee’s confidential comments and vice versa. However, the Administrator can view-only both the Employee and the Lead Confidential Comments.
Tips for Adding work plans: •It is a good idea to include the year (or some other identifier of the review period) in your Work Plan Title so that it is easier to find in the list. •There may be scenarios when an employee might have more than one of any type of Work Plan at a time, such as working on a special project as well as his/her own job - in that case you could enter the name of the project in the Work Plan Title.
1.Select the Work Plan to edit. 2.Select 3.The following fields can be edited from this screen: Work Plan Title, Period Dates, and Memo Notes. See Objectives for information on editing objectives attached to the work plan, and Resources for information on editing Resources attached to the objectives.
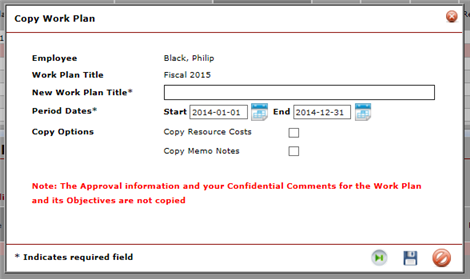
1.In the Upper Table, select the work plan to copy. 2.Select
3.Provide a new Work Plan title. 4.Select new work plan dates using 5.Select Memo Notes if you wish to have them copy to the new work plan. 6.If it was active for the current work plan, select Resource if you wish to have Resource information copied to the new work plan. 7.Save to close. Note: Approval information and Confidential Comments are not copied from one work plan to another.
To Copy a Work Plan to Multiple Employees 1.In the Upper Table, select the work plan to copy. 2.Select 3.Provide a new Work Plan title. 4.Select new work plan dates using 5.Select Memo Notes if you wish to have them copy to the new work plan. 6.If it was active for the current work plan, select Resource if you wish to have Resource information copied to the new work plan. 7.Save to close. Note: Approval information and Confidential Comments are not copied from one work plan to another. See Copy_Multiple Employees for information on copying a work plan to multiple employees.
Note: Because the work plan must be complete before it can be approved, the system performs a validation process that does the following: •Checks that all required fields are completed. •For some fields (for example Resource Category, Objective Category, Competency), checks that the fields are active at the time the “Validate” function is run. •Checks that the total percentage weightings across all objectives in the work plan add up to 100% when the Percentage Weighting is Enabled.
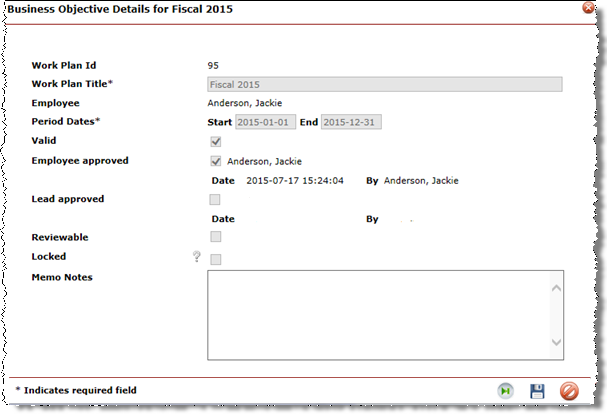
Note: the Work Plan must be Completed before it can be Approved. 1.Double-click the work plan to be Approved. 2.The Objective Details screen will open.
3.When the Employee is logged into Encompassing Visions, they will be able to check the box next to “Employee Approved.” Similarly, when the Lead is logged into the software, they will be able to check the box next to “Lead Approved.” 4.Save to close 5.The work plans screen will show check marks in the Approval column. 6.When the Work Plan Details screen is opened again, the date/time stamp and User ID will indicate when the Work Plan was approved by each party. Note: When a Work Plan is Approved, the Edit icon changes to View but still opens the Objective Details screen with all the fields disabled so no changes can be made. Administrator Note: Administrative Users can execute both Employee and Supervisor/Lead approvals if necessary.
Tip: A work plan can be printed and a paper copy signed by the employee and supervisor/lead. Use this method if you wish to maintain a signature for a paper file. This method may also be used if the employee and/or supervisor/lead do not have ready access to the system; an Administrative User with full access rights can enter the work plans into the system, print a paper copy, obtain signatures, then enter the approvals into the system on behalf of the employee and/or supervisor/lead.
1.Select the work plan that is to be deleted. Only work plans that have are not Approved can be deleted by the User. 2.Select 3.Confirm Delete – OK to delete, Cancel to return to previous screen. Note: Work Plans that have been approved cannot be deleted. To delete an approved work plan, it will need to be unapproved first (see below).
Note: When a Review has been started for the work plan, the work plan gets locked and must be unlocked by an Administrative User (see below). Once the work plan is unlocked, the review will be suspended and Reviewers will not be able to see it in the Reviews screen until the work plan is re-Validated and re-Approved.
1.Double-click the Work Plan to un-Approve. 2.Un-check the Employee Approved and Lead Approved status boxes. 3.Save to close. Note: When the Employee is logged into Encompassing Visions, they will be able to un-check the box next to “Employee Approved.” Similarly, when the Lead is logged into the software, they will be able to un-check the box next to “Lead Approved”. Administrative Users can un-check both Employee and Lead Approved boxes if necessary. They will not be able to take approvals off if A) there are one or more reviews already started or completed for it, and B) it is past the "review period end date"
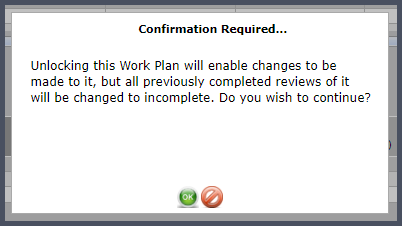
Only Administrative Users can Unlock a work plan. This security is in place to prevent the work plan from being changed after reviews have been completed for the work plan.
1.Select the work plan to be unlocked. 2.Click the Unlock icon
3.Read the Confirmation Message and click OK. 4.The work plan will now appear as incomplete, not approved and not locked. Changes can be made at this time.
Note: The review will not be reviewable (visible) during this process. It is still in the system but not accessible.
5. Once changes have been made, the work plan re-approved, the work plan automatically locks. 6. The reviews are now reviewable again. It will be marked as in progress and will need to be saved again. Information that was previously entered will remain intact.
Note: When a plan is automatically locked by the system after 2 years, it is not accessible to anyone for updating, including the Administrator, whether it has been previously approved or not.
To Print a hardcopy of an entire work plan with its corresponding list of detailed objectives: 1.Highlight the particular work plan you wish to create the report for. 2.Select
|